Lighting Setup
There are MANY ways to set up green screen that will work fine with EZ Green Screen. In general, EZ Green Screen is more forgiving than a lot of other extraction methods. Because of this, you can get creative with your lighting setup, even if that means the screen is not perfectly even. With that said, you should still sty to get decent lighting on the screen.
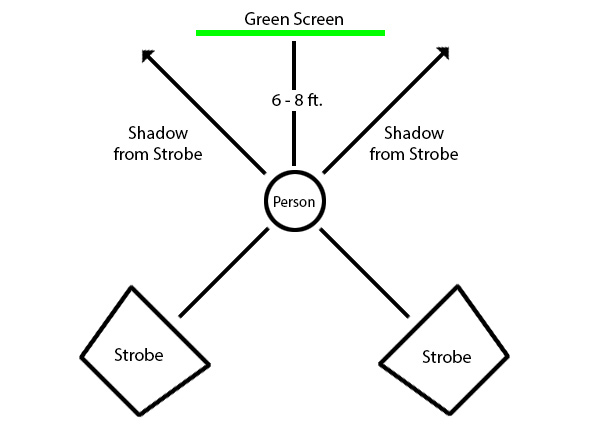
Try to avoid dark shadows whenever possible, Sometimes shadowing can't be avoided, For example, when doing a full body shot with the subject standing on the screen, there will be no way to avoid shadows. For this case, all areas of the screen should receive light by at least one flash source. For shadows, a general rule of thumb is the brightness value, as sample in Photoshop on the digital file, should be greater than 25% brightness. A simple way to accomplish this is by using 2 flash strobes at an angle to the person (one to the right and one to the left). The area that is shadowed by one light is illuminated by the other. Since some screen areas are lit by 2 lights and other areas are lit by one light, there will still be some shadowing. However, this should be good enough to get a good extraction.
Two strobes should be considered then minimum. You can often get away without lighting the screen. However, if the person is too far away from the screen or if the lights are too close to the person then the ratio of light exposing the person to how much light reaches the screen will become to offset. In this case, you may need to light the screen itself. There are way too many different situations and variable to give and exact rules to this. However, if the brightness of the green screen in the digital image file drop below around 45% as sampled in Photoshop then you should consider lighting the screen itself.
Kickers and hair lights are great for separating the subject from the screen. They can make the extractions easier and also help reduce green spill. Additionally they can provide dramatic lighting on your subject. These are optional but you may consider using them in your setup. The diagram below shows a bare minimum basic 2 light setup. This diagram is not meant to be something that you copy exactly. It is only meant to illustrate the most basic setup for getting a decent extraction.
Camera settings
Space your subject away from the green screen by 6 ft. or more if possible
The closer the subject is to the green screen, the more green spill that will be encountered. This is because the screen reflects green light back onto the person. Obviously, If you are doing an upper body shot, you will be able to space the person further away then if you are doing a full body shot. If you need for the person to stand or sit on the screen then try to use a screen that's long enough to cover sufficient floor area so that you can get decent spacing between the persons upper body and the back of the screen. Easy Green Screen does a pretty good job of green spill removal. However, its best to try to minimize the spill during the photo shoot.
Check the green screen exposure in Photoshop
Easy Green screen will automatically compensate for a variety of lighting conditions. You will however get the best results if you pay attention to how the screen is lit and adjust as needed. Use the adobe color picker to sample different areas of the screen.
The following numbers are what we consider optimal numbers.
sRGB color Profile: Hue=120-140, Sat=50-70, Brightness=50-60
Adobe 1998 color profile: Hue=105-125, Sat=50-70, Brightness=50-60
Minimize wrinkles in the screen whenever possible
If you have a stationary studio then this can be easily done by using a paper backdrop or a painted wall. If you are using a muslin green screen, then you will tend to have some wrinkles to deal with. Wrinkles can be ironed out (which is tedious).
To be honest, this is where we get lazy in our photo shoots. Since we do traveling photo shoots, using a large paper roll background is a bad option. Ironing out wrinkles isn't always an option either.
If your screen has some wrinkles then make sure to stretch the screen fairly well on the backdrop stand using some clamps so there are not any large folds. Also, make sure that light hits the screen from 2 angles. You should still be able to get a good extraction this way even with some wrinkles in the muslin.
Shoot in raw mode
This is not absolutely necessary. With that said, there are some big advantages.
First, there is not any .jpg compression. This is helpful when masking detailed areas.
Second, in-camera settings for the color profile, sharpening, toning, white balance, etc can be changed non-destructively because these are not directly applied to the image. They are just set points that are stored (similar to the Photoshop adjustment layers).
Article written by: Damon Bell
© Pixnub Software